image
image

Beginner's Corner

The Complete Guide

Welcome to Barbecue'n On The Internet's "Beginner Pages!" In this section we offer the basic lessons that should be mastered before continuing on to actual Grilling and Barbecuing. These lessons, as you will, are universal to outdoor cooking and will serve you well. They will also allow growing to advanced techniques. Review them often and study hard! Let's Begin . . . . We'll be getting to the Grilling and Barbecuing soon enough. But for now, we have grouped some of the "basics" into one area where they can be referred to for future purposes. Each of these lessons are important steps to beginning to understand how to cook outdoors. From time to time, we will add additional information as you, our readers, indicated a need for more information. In the meantime, enjoy yourself, relax and have some fun!

Beginner's Lessons

LESSON NUMBER 1 -"Seasoning a New Grill" - Now this may seem strange to the beginner, but YES, you really should "season" the grill. And no, we are not discussing spices and marinades . . . . Each grill manufactured will contain some impurities resulting from the manufacturing process. To "season" the grill and remove the impurities or residue and residual metals, simply build a fire in the grill or barbecue pit and simply allow it to burn at 350 degrees (more or less) for several hours. The weekend before would be a great time to do this. It'll give you practice also. When the fire has died down [or turned off and cooled for gas grills] simply take some old rags and rub down the cooking grids where the food rests when cooking and the inside of the lid. Remove all ashes for charcoal grills and you are then ready for the first formal cookout! If you find this to be too much trouble, it can be omitted - but we don't recommend it. How to start the fire will be discussed in the grill or barbecue section .

LESSON NUMBER 2 - "Seasoning the meat" - Each person has confronted the statement "If I told you what was in this seasoning, I'd have to kill you!" The truth of the matter is that most seasonings, and this would include liquid marinades, contain many common ingredients found in your spice rack and refrigerator. For the beginner, we recommend start by using someone else's premixed rubs and marinades. These are available in the local grocery store or butcher shop. Read the labels and then try several to determine which one works for your palates. Later, you may want to visit our "World of Spices Pages" [currently under construction] and begin preparing your own secret mixtures.

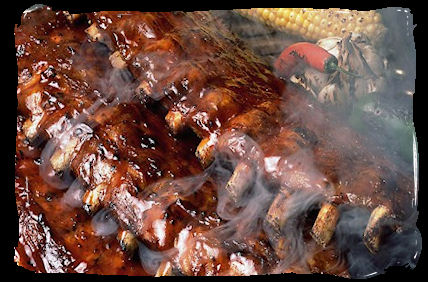
Additionally, we want to dispel some misconceptions that are prevalent in the beginning of each barbecuer's evolution. Everyone knows dried out meat and wants to avoid it at all cost. The most common mistake involves the use of barbecue sauce being spread on the meat while it is cooking. Our advice: DON'T DO IT! Most commercial barbecue sauce is made with sugar and tomatoes. Both of these items burn at very low temperatures. Use them only when the fire has been either turned off [gas grill] or the charcoal is almost out. Allow the temperature to drop significantly before adding barbecue sauce to the meat. The temperature should only be hot enough to dry the liquid out of the sauce, not cook/burn it.

I can hear it now . . . . "So what do I use to keep the meat from drying out?" There are several options to consider. You can use a barbecue sauce that does not contain sugars or tomatoes and thin it with water, apple juice or beer/wine. Many salad dressings make excellent marinades. We would also thin these in the same manner. Play around with different ideas and see what fits your palate. But don't burn the sauce!

LESSON NUMBER 3 - "Temperature of the Fire" - Is my fire too hot? Not hot enough? Am I doing this right? Soon, and with some practice, you will learn the answers to these questions. Two factors are in your favor, for adjusting for the proper amount of heat . . . . . First, it is always possible to add additional charcoal or turn up the gas when the fire is not hot enough [this is not usually the case with gas grills]. On charcoal grills, there is normally an adjustable cooking grid that may be lowered closer to the heat.

Secondly, if things are too hot, Raise the meat on charcoal. You can also close the air intake holes and slow down the fire. Do not close the ones on top unless you desire to kill the fire entirely. On gas grills, first turn down the amount of gas being applied to the fire. If this is not enough, then you can open the door about an inch and place a piece of metal to hold it open. Adjust opening size accordingly. OK, now that we can adjust the heat levels, how hot is it at the cooking service?

"Simple" is the answer. Just set someone's hand on down close to the grills cooking surface [the grates] CAREFULLY! and only after reading the following guidelines for determining the approximate temperature of the heat.

DEPENDING UPON HOW LONG ONE CAN MAINTAIN AN OPEN HAND IN PLACE WILL DETERMINE THE APPROXIMATE TEMPERATURE [ROUGHLY] OF THE SURFACE OF THE GRILL

  • One Second (or less) = Very Hot Fire - 600 degrees or higher
  • Two Seconds = Hot Fire - 500 to 650 degrees
  • Three Seconds = Medium Hot Fire - 450 to 550 degrees
  • Four Seconds = Medium Fire - 400 to 500 degrees
  • Five Seconds = Low Medium Fire - 300 to 400 degrees
  • Six Seconds (or more) = Very Low Fire - 300 degrees or less

    These are rough estimates and can vary depending upon where on the surface of the grill the hand is placed. For example, there may be more heat in one location than another.

    Careful attention needs to be paid to the meat when grilling. Grilling as opposed to "barbecuing" requires much higher cooking temperature, because grilling needs to cook the meat quicker to prevent it from being dried out. Remember one important fact, the meat is located directly over the heat sources and as such, has the direct effect of offering large quantities of dry, hot heat to the entree. Therefore, the possibility of burning is much greater than when "barbecuing".

    LESSON NUMBER 4 - "Open or Closed Lid Cooking" - When grilling, we recommend using the grill with the lid in the up position. The reason is that when cooking with the grill lid down, it has the tendency to smother the fire, create soot and thus taint the meat. The lid is, however, useful for putting out the fire when flame-ups occur.

    LESSON NUMBER 5 - "Time vs. Temperature - A Discussion" - Over and over, we are asked "How long should I cook a ________?" The truth of the matter is that we don't know! Now that may seem a little strange at first glance, but here is the truth of the matter. To even attempt to answer that question, we have our own questions that must be addressed . . .

  • How hot is the fire at the surface . . . in the chamber?
  • How far is the meat from the heat - directly above or offset?
  • How thick is the meat that is being cooked?
  • Is the cooking area open or closed . . . lid or no lid?
  • What is the outdoor temperature 40 degrees. and 20 mph wind?
  • How often is the meat basted . . . or lid opened to look?
  • Do you want rare, medium, well done or charred meat?

    As you can see, cooking by time creates more problems that it solves. Besides, some of these variables will change each time you cook and one set time to cook the food one day may not be right the next day. We seek consistency in our meals and we want you to know how good barbecue cooks prepare consistently good products.

    LESSON NUMBER 6 - "When do I turn the meat?" - is a favorite question received by us. It usually varies depending upon what is being cooked and how hot the fire is. Our "catch all" answer is you turn the meat after the meat begins to turn color [usually browning occurs] and after the meat is released from the cooking grates [i.e. when it does not stick to the surface any longer]. Turning frequently does not hurt or harm the meat, however we try to obtain a good cooking on each side before turning it over.

    LESSON NUMBER 7 - "When is the sucker done?" - Simple again . . . . it is a matter of relationships of temperature, heat and time. To get a handle on the internal meat temperatures and doneness, we strongly suggest visiting the Barbecue'n's Cooking Temperatures. We'll discuss "doneness" in more detail later on.

    The common denominator to great outdoor cooking is to cook the food the same way every time. In order to obtain this consistency, we strongly recommend using a bi-therm instant read thermometer. These thermometers, when inserted into the meat, will determine the meat's internal temperature. No guess work, no under cooked chicken which can be dangerous to eat. Bi-Therm Thermometer As you can see from the thermometer to the left, they have a narrow probe that is inserted into the meat and after 10 to 15 seconds, can tell how far along the meat is done. ONLY in this manner will you really know if the meat is cooked to the desired doneness. One of these thermometers costs about $10 to $12 and will save hundreds of dollars in meat which might otherwise be ruined on the grill or in the pit.

    One additional tip thrown in here dealing with when the meat is done . . . . always take the meat off just before the meat reaches it's doneness because it will continue to cook for several minutes after being removed from the grill and while the places are being taken at the table.

    And for those of you who would like to estimate the doneness of the meat [with less consistency], we have another slight of hand trick for your use. Try pushing against the meat with a fork or spatula and check it's elasticity.

    If the meat is very elastic and soft, the meat is probably between raw and rare. Next, if the meat is somewhat firm but maybe described as having a spring to its feel, it is probably equal to a medium doneness. Following this, if the meat is very firm yet still has some movement to it, the meat is medium-well to well done and needs to be removed from the grill before death and disaster take over. Finally, if the meat does not move and is rock hard firm, call in the mortician, it is dead. Although we must admit, some folks like 'em that way . . . . .

    With us so far? . . . . . . . GREAT, then let's move on . . . . . .

  • Wood & Charcoal Grilling
  • Gas Grilling
  • Barbecuing
  • Back to the Beginner's Page


  • The Barbecue Store
    New Sale Items
    all the time! Check out
    what's hot in outdoor cooking

    For all of your gas grill parts
    We have a large selection of replacement parts for almost any type of gas grill

    Traeger Wood Pellet Grills
    Click Here to request free catalog from Traeger Wood Pellet Grills. Learn more about the benefits of using a pellet grill.

    Barbecue'n Guy!Barbecue'n On The Internet has been serving millions and millions of satisfied readers every year since February 3, 1996

    Smoke 'n Fire Enquirer
     

    See Our Privacy
    Policy Here

    Sign up for our newsletter today and begin preparing better barbecue and grilling meals today. It's totally free and contains more great outdoor cooking information.


    Sample Newsletter

    Email address:

    First name:

    Last name:

    Names are really important to identify you
    as we give free stuff away in our newsletters!
    Subscribe   Unsubscribe  
          

    image
    image
    image